Distributed Systems Practice Notes
Cloud Web Apps - Amazon S3 Lab
October 09, 2018
Amazon S3 is short for Simple Storage Service, which is an object storage service of AWS. This lab introduces the common features of S3.
Official Links
Operations
1. Create a bucket in Amazon S3
In the AWS Management Console, click S3 on the Services menu to open S3 console.
-
Click Create bucket button
- Name the bucket as mybucket{some random number}, duplicate names are not allowed
- Leave Region to default value, objects will be only stored to the designated region, explicit transfer to another region is possible
-
In the Configure options dialog box
- Check Keep all versions of an object in the same bucket
- Leave other options to default value (e.g. no public read access to bucket)
-
Finish by clicking Create bucket button
- If an error concerning the bucket name occurs, go back and change the bucket name until it works
2. Add an object to bucket
An object can be any kind of file: text, image, video and etc.
- Download the Sheep.jpg to your computer
-
Select the bucket just created in S3 Management Console
- Click Upload button
- Click Add files button
- Select the image file then click Upload button
- Once uploaded, the file will be displayed in bucket
3. Manage access permissions on an object
By default, uploaded objects are private, not publicly accessible.
-
Click on the S3 link for the image file
- A XML based Access Denied error will be displayed
-
Make the file public
- Click on the file in console
- Under Permissions tab, Public access section, select Everyone
- Select Read object and save
- Open the S3 link again, the image will be shown
4. Create a Bucket Policy
Grant access to the entire bucket by setting up a policy.
-
Find ARN (Amazon Resource Name) of bucket in the Permissions tab,

-
Generate Policy
- Click the Policy generator link
- Set Select Type of Policy to
S3 Bucket Policy, Principal to* - Set Actions to
GetObjectso that anyone will be able to access - Append
/*to ARN to allow the policy to apply to all objects within the bucket - Click Add Statement and then Generate Policy
- Copy and paste the generated JSON object to Bucket policy editor
- Save and test by accessing any object
5. Use bucket versioning
-
Create a different version of object
- Upload a different image file with the same as an existing file in bucket
- Test the S3 link, it will point to the latest version
- Previous versions could be found by clicking on Latest version

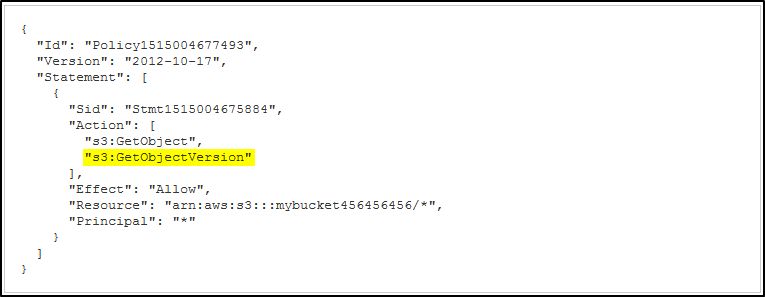
- By default, the previous version is not accessible via the S3 link, grant access to previous version
by appending field
s3:GetObjectVersionto policy
- Save and the policy takes effect

Written by Warren who studies distributed systems at George Washington University. You might wanna follow him on Github