Distributed Systems Practice Notes
Bare Bones CI In Action
November 09, 2018
Continuous integration is a DevOps buzzword, which indicates the practice of continually merging source code updates from developers, conducting tests and building artifacts upon the shared mainline. Disasters used to happen during a code merge when a developer works in isolation and drifts too far from the work of others. CI offers a fail-fast mitigation by automating the tasks of constantly building and testing the integrated artifact, which saves Ops team from human efforts beyond imagination. This article compares 2 possible CI solutions, and introduces how to set up a private CI environment in detail, hopefully it will help if you are trying to deploy CI in an enterprise environment.
Tech Overview
There are various software components of choice to build up a CI environment, the diagram below shows 2 possible solutions under one workflow.
Workflow
- Developers push code to version control system (Git, Github, Subversion)
- Version control system notifies CI manager (Jenkins or Travis) about the update
- CI manager pulls the latest code, conducts unit test and builds artifact
- If all tests are passed, the artifact will be staged for deployment, if not, dev team will be notified by email.
Comparisons between the 2 Solution Stacks
Use Case & Cost
The path on the left suggests a completely private CI solution, in which all the components could be installed inside the LAN environment of enterprise without public accessibility, also the solution is free of software licence charges.
In contrast, the path on the right is more suitable for open source projects. As long as you keep your project open-source, the CI solution is free of charge, however, once you turn your project into private, the monthly cost could go up to a few hundreds of dollars.
Git vs. GitHub
Git is a well-known open source version control system, which applies client-server architecture. It is possible for an enterprise to set up a private Git server to manage internal code repositories.
GitHub, perhaps the largest open source code management community for now, builds its service on Git, and gains popularity over years. By default, code repositories on GitHub are publicly accessible to anyone to fork, star, or even send pull requests. However, if you pay $7 per month, GitHub also allows to manage private repositories for you.
In order to notify about version control system events, Git provides native Git Hook, which is a bash, Python or Ruby script that could be triggered by events such as receiving a push from client. For GitHub, it provides a web service called Webhook, which is configurable on GitHub website, upon specified events, sends out an HTTP POST request to the URLs you provide.
In this demo, the post-receive Git hook is used, which is written in a short bash script that calls Jenkins web API to trigger a build upon client pushes code to the private Git server.
Jenkins vs. Travis-CI
Both Jenkins and Travis-CI are popular CI management tools, however, they are for different types of projects.
Jenkins is a Java-based, open source software, which is supported by a massive set of plugins that allow you to construct all kinds of CI pipeline. Even though Jenkins allows flexibility to a large extent, it requires a dedicated server machine and maintenance from the dev team.
Travis-CI, as a cloud service, does not require a dedicated server. It is light-weighted and easy to set up, however, less customizable than Jenkins. It is free for open source projects, works best with GitHub. For private projects, Travis-CI has monthly charges starting from $69 to $489.
In this demo, Jenkins is used along with a Docker build plugin. The building and testing of app code could be managed by Jenkins as there are quite many plugin supports. Also, these SDLC processes could happen in Docker engine, directed by a Dockerfile that sits along with the app code.
Registry vs. Docker Hub
The Registry is an open source, server side application that stores your Docker images. The Registry requires Docker engine version 1.6.0 or higher, the software itself, is available on Docker Hub as a Docker Image. It suits best for in-house integration of Docker image storage and distribution. As a result, the responsibility of configuration and maintenance falls upon dev team again. However, once set up, Registry stores unlimited private repositories free of further charges.
Docker Hub is the most well known alternative, also the default Docker image registry. It is a ready-to-go solution that requires almost zero configuration and maintenance (well, you still need a Docker Hub account). Docker Hub allows only 1 free private repository, if you intend to have more, you need to upgrade to the Docker Hub Enterprise plan, which allows maximum 100 private repositories with monthly charge starting from $7 up to $100.
In this demo, a private Registry container is installed on a dedicated server, which stores the artifact Docker image pushed by Jenkins server.
Implementation Road Map
- Set Up Private Git Server
- Set Up Private Docker Registry Server
- Set Up Jenkins Server
- CI - Hook Jenkins to Git
- CI - Jenkins Builds Docker Image Upon Dockerfile
- CI - Jenkins Pushes Docker Image to Registry
Prerequisites
- 3 Amazon Linux2 Virtual Machines (hosted on Amazon EC2)
Server Network Configurations
-
Jenkins Server
- Open port 8080 for inbound TCP connections
- Open port 4243 for inbound TCP connections
-
Docker Registry Server
- Open port 5000 for inbound TCP connections
Server Software Configurations
-
Git Server
- Install Git
- Collect SSH public key of any Git client (Jenkins server, developer machine, etc)
-
Jenkins Server
- Install open-jdk-8
- Install Jenkins
- Install Git
- Install Docker CE
-
Docker Registry Server
- Install Docker CE
For any server above, update system packages before conducting other operations
sudo yum -y updateOperations
Set Up Private Git Server
- Install Git on Git Server and Jenkins Server
sudo yum -y install git- Generate SSH public key on Jenkins Server and developer machine
ssh-keygen -t rsa
...
Your identification has been saved in ~/.ssh/id_rsa.
Your public key has been saved in ~/.ssh/id_rsa.pub.- Create SSH public key storage file authorized_keys on Git Server
mkdir .ssh
chmod 700 .ssh
touch .ssh/authorized_keys
chmod 600 .ssh/authorized_keys- Copy SSH public key to Git server
On client machine, show and copy public key
cat ~/.ssh/id_rsa.pubOn Git Server, paste public key (separate each one by an empty line)
vim .ssh/authorized_keys- Create an empty repository on Git Server
git init --bare demo.git- Try to pull the repository on client
git clone ec2-user@ec2-35-173-196-232.compute-1.amazonaws.com:demo.git demo

Cloning into 'demo'...
warning: You appear to have cloned an empty repository.
If you see the message above, your private Git server is ready.
Set Up Private Docker Registry Server
- Install Docker CE on Docker Registry Server
sudo yum install docker -y
sudo service docker start
sudo usermod -a -G docker ec2-user- Pull Registry image
docker pull registry- Start a Registry container, map container port 5000 to host port 5000, and mount host directory /myregistry
docker run -d -p 5000:5000 -v /myregistry:/var/lib/registry registryThe repositories pushed to Registry container will also be stored at /myregistry on Docker host, they won’t get lost even though the Registry container is stopped.
Set Up Jenkins Server
Install Jenkins
- Install JDK
sudo yum install -y java- Add Jenkins repository to yum
sudo wget -O /etc/yum.repos.d/jenkins.repo http://pkg.jenkins-ci.org/redhat/jenkins.repo
sudo rpm --import https://jenkins-ci.org/redhat/jenkins-ci.org.key- Install Jenkins
sudo yum install -y jenkins- Check JENKINS_PORT (default: 8080)
sudo cat /etc/sysconfig/jenkins- Start Jenkins Service
sudo service jenkins startPre-Configure Jenkins
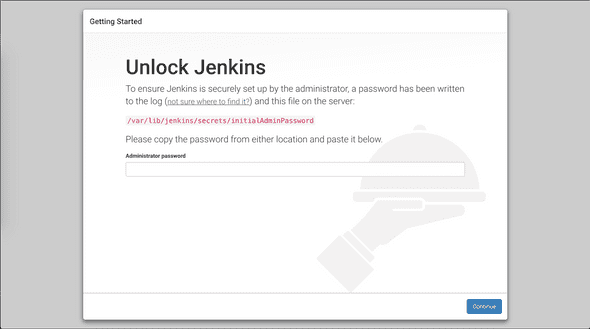
- Visit Jenkins Admin Console http://ec2-52-90-247-111.compute-1.amazonaws.com:8080/ for the first time, it shows
- Show initial admin password
sudo cat /var/lib/jenkins/secrets/initialAdminPasswordCopy the password to console, then click on the continue button.
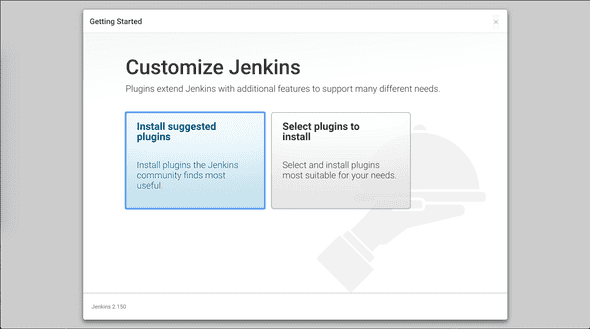
- Install suggested plugin
A collection of plugins will be installed after you click on the button on the left.
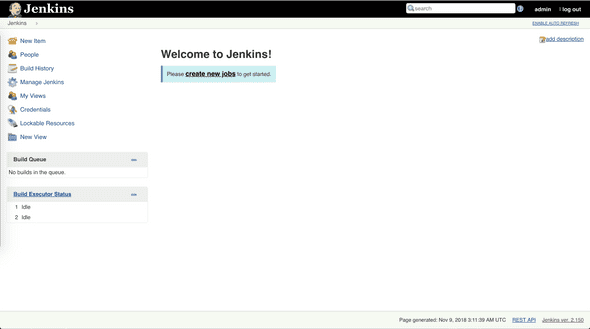
- Set up Admin username and password, login console
CI - Hook Jenkins to Git
-
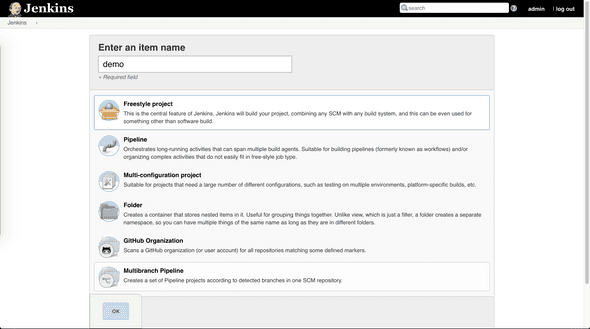
Create a new Jenkins job
- name: demo
- select Freestyle project
- Link job to the private Git repository
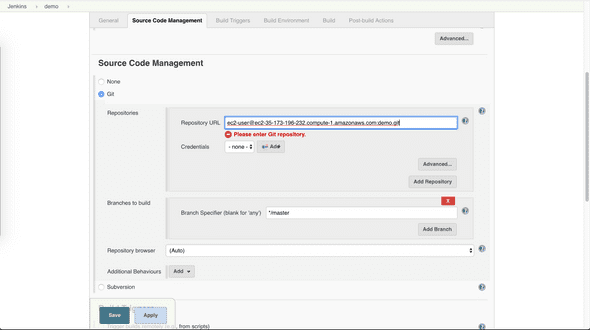
Under Source Code Management tab, select Git and enter repository url (username@git_server_IP addr:path_to_repo)
-
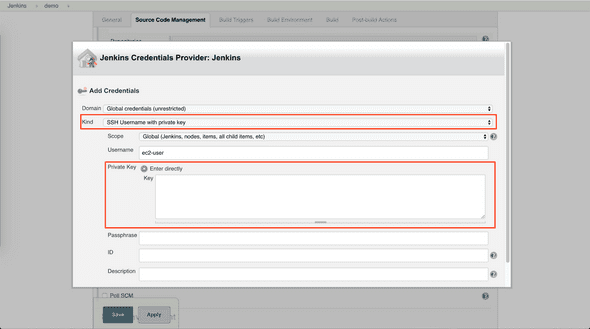
Add SSH private key of Jenkins server in credential
-
Select Kind as SSH Username with private key
-
Select Enter directly for Private key
To show private key, run
cat ~/.ssh/id_rsa
-
As a Git client, Jenkins Server is able to pull code repository from Git Server now.
- Set up build trigger
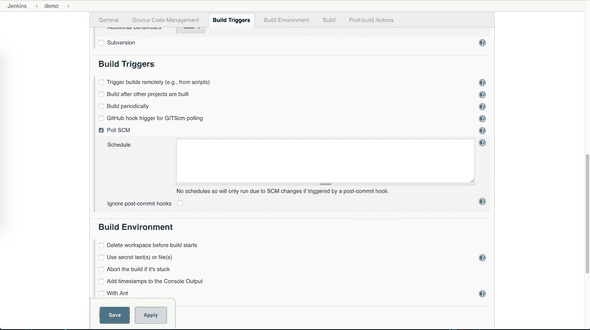
Select Poll SCM and leave Schedule blank,
If you would like to trigger a build at a certain time of day or every a few hours, you can set it up in the Schedule box so that Jenkins Server polls Git Server according to your schedule to check if any update is available.
In this demo, a build is only triggered when code is pushed to the Git Server.
- Set up post-receive hook on Git Server
Create post-receive hook in demo repository, which is triggered when Git server receives a commit
cd ~/demo.git/hooks
touch post-receive
chmod +x post-receive
vim post-receive
Write bash script into post-receive hook, which notifies Jenkins of the code push
#!/bin/sh
curl http://ec2-52-90-247-111.compute-1.amazonaws.com:8080/git/notifyCommit
?url=ec2-user@ec2-35-173-196-232.compute-1.amazonaws.com:demo.git
The script makes an HTTP request to the Jenkins Server API, whose url is in format <Jenkins Server IP>:<Port>/git/notifyCommit, and passes a parameter which indicates the Git repository information.
Once the hook is set up, any code push to the demo repository will trigger a Jenkins API call.
- Test hook by pushing some code to Git server,
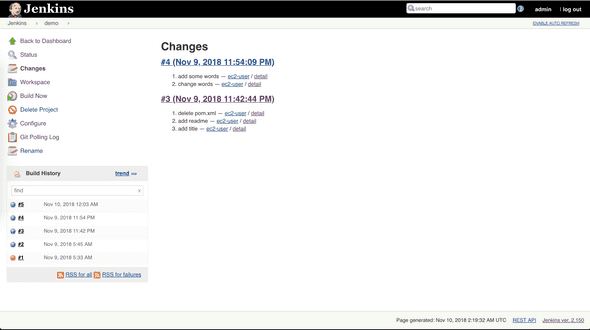
In Jenkins console, the code push is polled by Jenkins and triggers a build thereafter.
CI - Jenkins Builds Docker Image Upon Dockerfile
- Install Docker CE on Jenkins Server and start Docker service
sudo yum install docker -y
sudo service docker start
sudo usermod -a -G docker ec2-user- Install docker-build-step plugin in Jenkins console
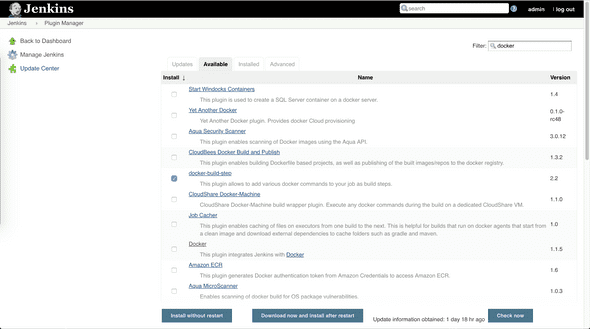
Go to Jenkins plugin manager, select Available tab, search for docker-build-step, and then click on Install without restart button.
- Enable Docker Remote API
Open the file /lib/systemd/system/docker.service, search for ExecStart
vim /lib/systemd/system/docker.serviceReplace ExecStart value
ExecStart=/usr/bin/dockerd -H tcp://0.0.0.0:4243 -H unix:///var/run/docker.sockRestart Docker service
sudo systemctl daemon-reload
sudo service docker restart
Test calling API
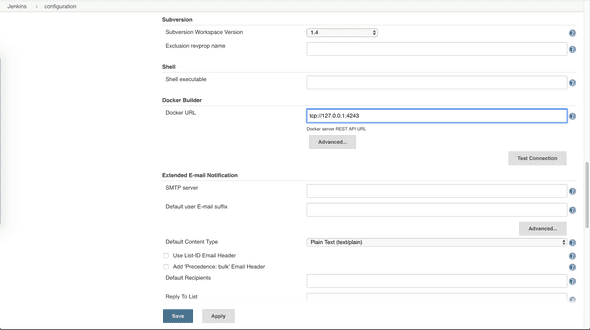
curl http://localhost:4243/versionIf it works, configure Docker URL as tcp://127.0.0.1:4243 in system configuration
Now Jenkins can trigger Docker build by calling Docker Remote API, which listens on port 4243.
-
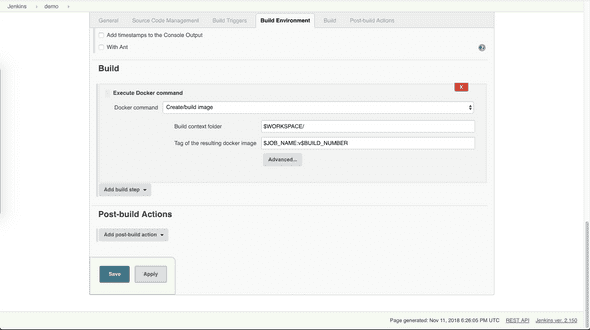
Add Docker build step in Build Environment section for job Demo
- Click on Add build step button
- Select Execute Docker Command
- Select Create/build image
- Set Build context folder to $WORKSPACE/
- Set Image Tag to $JOBNAME:v$BUILDNUMBER
This configuration assumes a Dockerfile sits along the application code that is pulled from Git Server, builds artifact as a Docker image and conducts tests according to specifications in the Dockerfile. Any error in the Dockerfile will lead to build failure. If the build is successful, a Docker image will present on Jenkins server with repository name demo ($JOB_NAME), and tag v11 (v$BUILD_NUMBER).
To verify the build, run command
docker images- Test by pushing a Dockerfile with app code to Git server, watch Docker image build and run app container
On developer machine, clone demo repository first.
Create an index.js file with content below,
var os = require("os");
var hostname = os.hostname();
console.log("hello from " + hostname);
Create a Dockerfile
FROM alpine
RUN apk update && apk add nodejs
COPY . /app
WORKDIR /app
CMD ["node","index.js"]
Commit and push, in a few seconds, Jenkins finishes building Docker image,
Show images,
[ec2-user@ip-172-31-41-17 ~]$ docker images
REPOSITORY          TAG                 IMAGE ID            CREATED             SIZE
demo                v12                 9c8409996ab5        3 minutes ago       32.6MB
alpine              latest              196d12cf6ab1        2 months ago        4.41MB
Run a container on demo:v12,
[ec2-user@ip-172-31-41-17 ~]$ docker run 9c84
hello from c487f3634efb
CI - Jenkins Pushes Docker Image to Registry
- Enable HTTP protocol for image push on Jenkins Server
Open the file /lib/systemd/system/docker.service, search for ExecStart
vim /lib/systemd/system/docker.serviceAppend ExecStart value with (private Docker Registry IP addr:port)
--insecure-registry ec2-18-206-231-25.compute-1.amazonaws.com:5000By default, Registry uses HTTPS for image push, to simplify the set up, configuration as above is needed.
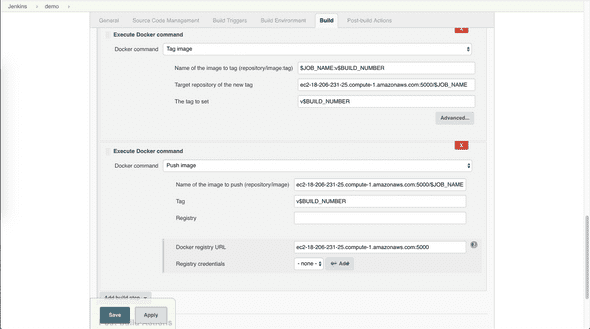
- Add 2 additional Docker build steps
Tag the image and push it to the private Docker Registry
First, add a build step which tags the local image as <private Docker Registry IP addr>:<Port>/$JOB_NAME, then add another build step which pushes the newly tagged image to private Docker Registry.
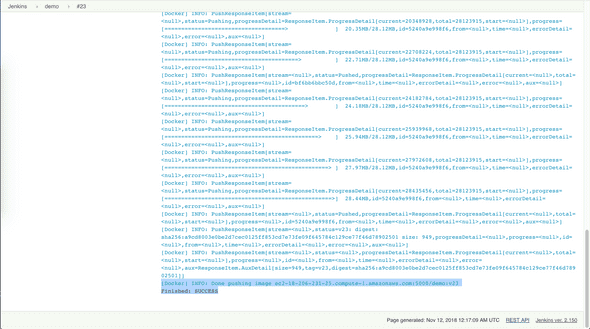
- Test by triggering a build and check private Docker Registry
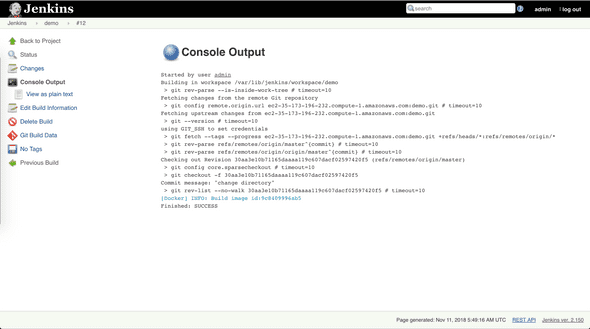
On Jenkins console, it will show the build log with a success message at the end as below, which indicates the Docker image has been built and pushed to the private Docker Registry.
On Docker Registry Server, check the directory that has been mounted to Registry container, the image just pushed could be found in
ls /myregistry/docker/registry/v2or simply call the Registry API,
curl ec2-18-206-231-25.compute-1.amazonaws.com:5000/v2/_catalog

{"repositories":["demo"]}

curl ec2-18-206-231-25.compute-1.amazonaws.com:5000/v2/demo/tags/list

{"name":"demo","tags":["v15","v16"]}
Reference Links

Written by Warren who studies distributed systems at George Washington University. You might wanna follow him on Github
